
A label marks a passage of a transcript so you and your team can find it again. Use labels for anything you want to pick out of a conversation: an objection on a sales call, a quote for a research report, a decision in a meeting, or a word the transcription got wrong. Each label has a name, a colour and an optional description, and labels can sit inside groups.
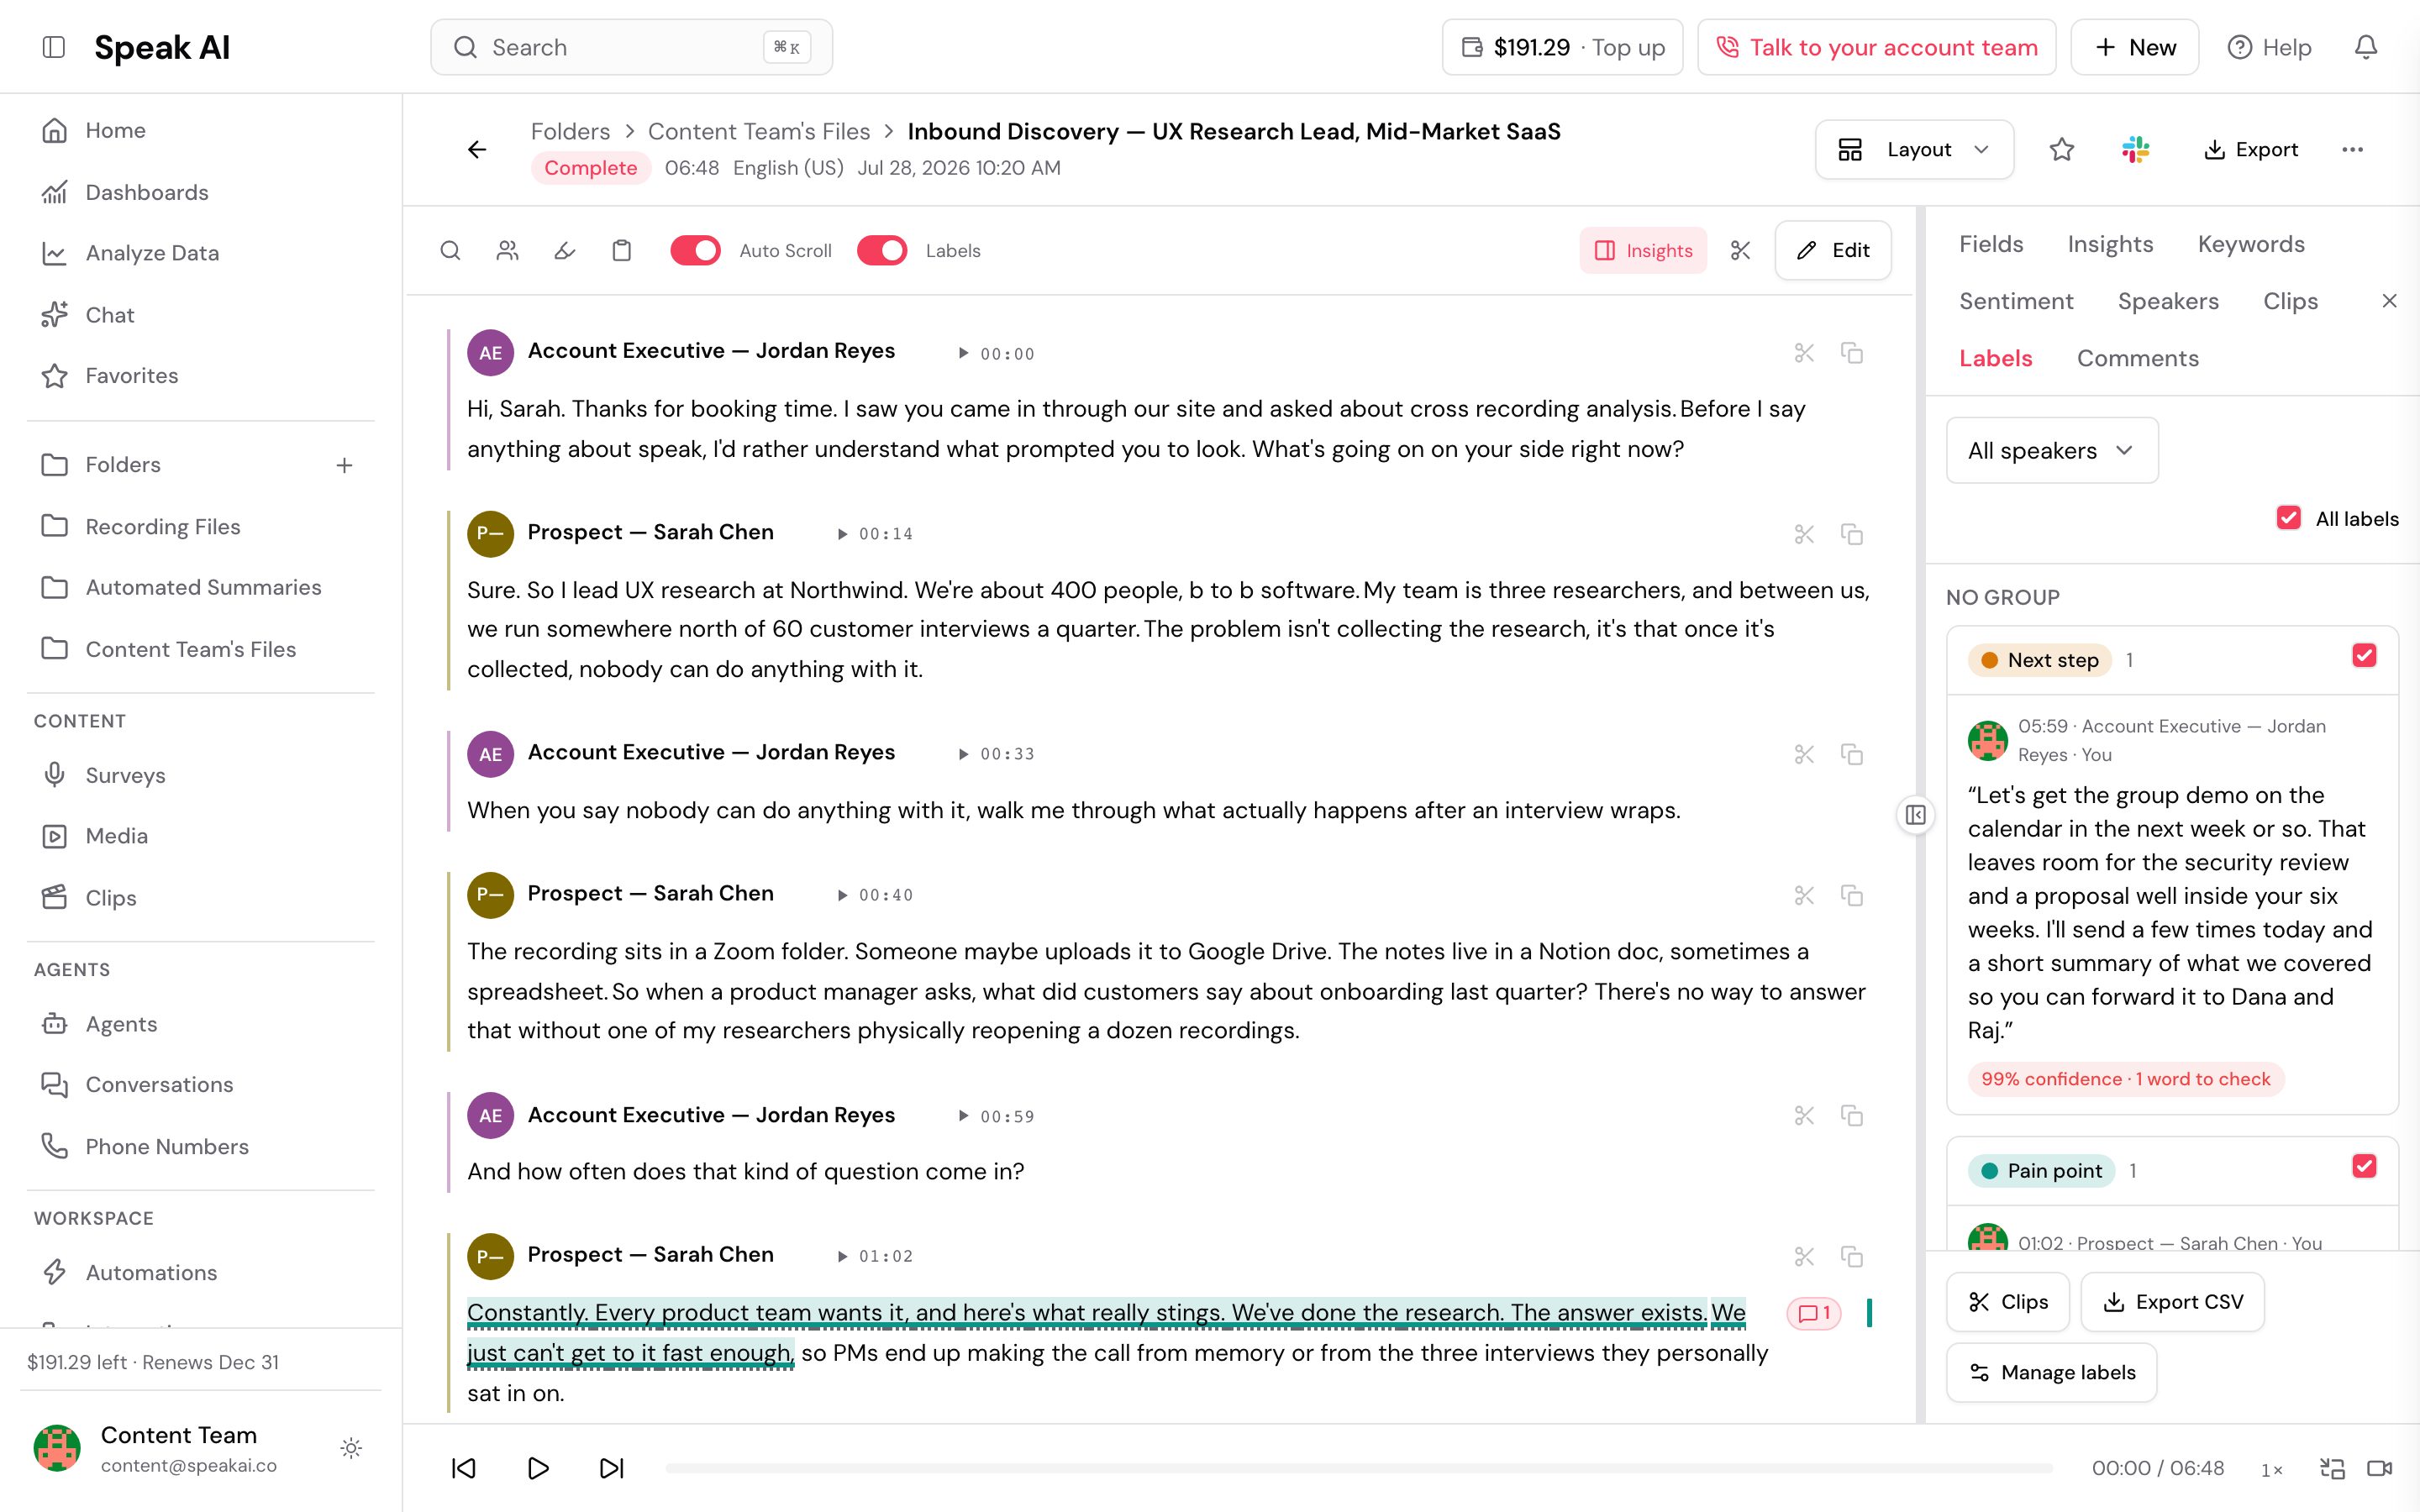
Your team shares one list of labels, so everyone marks passages the same way. Anyone who can open a file can see the labels on it. To talk about a passage instead of marking it, use comments.
Label a passage
Labels are added while you read a transcript, not while you edit it.
- Open a transcribed file.
- Select the words you want to label. The selection snaps to whole words.
- Click Label in the toolbar that appears above your selection. You can also right-click the selection and choose Add label, or press Cmd/Ctrl + Shift + L.
- Pick one or more labels in the picker, then confirm.
The right-click menu also lists the three labels you used most recently, so you can apply a common label in one click.
Labelled words get a coloured bar under them. When labels overlap, the bar splits into one block of colour per label along the passage. A stripe in the right margin shows where labels sit in the whole transcript, and hovering over a labelled passage lists its labels. Click a label to move the player to that point.
Use the label picker
The picker lists your team’s labels inside their groups.
- Type to search. If nothing matches and you are allowed to create labels, create a new label from the same box.
- Tick several labels to apply them to the same passage at once.
- Click Manage labels to open the label manager without leaving the file.
You can only apply labels, not groups. A group keeps related labels together in the list.
Change or remove labels on a passage
Right-click a labelled passage, or hover over it, to change which labels it carries or to remove them. Removing a label from a passage does not delete the label from your team’s list.
See every label on a file
The Labels tab sits in the panel to the right of the transcript, next to Insights. It lists every labelled passage, grouped by label and then in transcript order, with a count for each label.
- Filter by speaker with the speaker menu, or show only passages that need review with the Needs review chip.
- Click a passage to jump to it in the transcript and the player.
- Turn any passage into a clip with Make clip.
Each passage in the tab, and the card you see when you hover over a passage, shows how confident the transcription was for those words: the average confidence and how many words are worth checking. This uses the same confidence levels as the transcript’s confidence view, so a label on a passage the transcription was unsure about is easy to spot before you rely on it.
Export labels to a spreadsheet
To take the labels out of Speak AI, export them as a CSV. Open the file, click Export, and
choose Labels (CSV). The download is named after the file, ending in -labels.csv.
To export the labels on several files, select them in a folder, click Export and choose Labels (CSV). You get a ZIP with one CSV for each file that has labels, and files without labels are left out. Tick Merge into single file to get one CSV with the rows of every file instead. If none of the files has labels, nothing downloads and you see “No labels found for these files”.
The CSV has one row for each labelled passage and label, so a passage with two labels gives two rows. The columns, in order:
| Column | What it holds |
|---|---|
| File name | The name of the file |
| Media ID | The file’s ID, for matching rows to the API |
| Folder | The folder the file sits in |
| Group | The label’s group, empty for a label outside a group |
| Label | The label’s name |
| Label colour | The label’s colour, as a hex code such as #7c3aed |
| Start | Where the passage starts in the recording, as HH:mm:ss.SSS |
| End | Where the passage ends, as HH:mm:ss.SSS |
| Speaker | Who speaks in the passage, with several speakers separated by / |
| Excerpt | The labelled words |
| Added by | The team member who added the label, or the name a reviewer gave on a share link |
| Added at | When the label was added, as an ISO 8601 date |
| Status | active, shifted or needs_review (see When you edit a transcript) |
| Confidence % | The average transcription confidence of the passage’s words, empty when the transcript has no confidence figures |
| Comment count | The comments and replies on the passage, without deleted ones |
Passages that need review are included, and the Status column tells them apart. Archived labels
are left out. A cell that starts with =, +, - or @ gets a leading ', so your spreadsheet
shows it as text instead of running it as a formula.
Show or hide labels
You choose what the transcript shows. Your choices are saved to your account and do not change what anyone else sees.
- The Labels switch in the transcript toolbar shows or hides every label on the transcript.
- In the Labels tab, tick or untick All labels, a group, or a single label to show or hide just those. Show all and Hide all reset every choice at once.
To choose how every file opens, go to Preferences, open the Media View tab and use the Show labels on the transcript switch under Fine tune.
The Labels and Comments tabs can also be reordered, set as the default tab, or hidden there, like the other tabs in that panel. See Preferences.
Manage your team’s labels
Open the label manager from Profile, then Labels, or click Manage labels in the Labels tab or the picker to open it as a side panel on the file you are reading.
- Click New label to create a label. Give it a name, a colour and, if it helps people choose, a description. Pick one of the preset colours or enter your own.
- Create a group, then drag labels into it. Drag labels and groups to change their order. Groups go one level deep: a group cannot sit inside another group.
- Select a label to see its description, how often it has been used and recent passages that carry it, and to Edit, Merge or Archive it.
Label names are unique within a group, ignoring capital letters, so you cannot have two labels called “Follow-up” in the same group.
Archive a label
Archiving takes a label out of the picker so nobody applies it again. Passages already labelled keep it, and nothing is deleted. Archiving a group archives every label in it. You can restore an archived label or group at any time, as long as no active label has taken its name in the meantime.
Merge two labels
Merge a label into another when your team has two labels for the same thing. Every passage that carried the first label now carries the second, and the first label is archived. A passage that already had both keeps one. A merged label cannot be restored, so check the target before you merge.
Add Speak label sets
Speak AI offers ready-made sets of labels for common work. Each set arrives as a group of labels tagged Speak, which you can rename, recolour and edit like any other label.
| Set | Labels |
|---|---|
| Sales QA | Unprofessional, Slang, Objection, Great moment, Compliance risk |
| Research | Pain point, Motivation, Quote for report, Surprise, Follow-up |
| Meetings | Decision, Action item, Risk, Open question |
| Transcript feedback | Wrong split, Misheard word, Wrong speaker, Bad translation |
To add one, open the label manager and click Add Speak labels, then choose the sets you want. Adding a set you already have does not create copies: labels you already have with the same names are reused.
Who can do what
Admins set label permissions for each person in Team, in the Labels section of the permissions grid. Owners can do everything.
| Permission | Lets someone | Admins by default | Members by default |
|---|---|---|---|
| Create | Create labels and groups, and add Speak label sets | Yes | Yes |
| Update | Rename, recolour, describe, regroup and reorder labels | Yes | Yes |
| Delete | Archive and restore labels | Yes | No |
| Assign | Apply, change and remove labels on transcripts | Yes | Yes |
Merging needs both Update and Delete. Seeing labels needs no permission: anyone who can open a file can see its labels. People without a permission do not see the buttons for it. See Groups and permissions for how folder access decides who can open a file.
When you edit a transcript
Labels stay with their words when you or a teammate edit the transcript. When you save, Speak AI follows each labelled passage to its new place:
- If the words are unchanged, the label moves with them, even if they moved to a different spot.
- If most of the words survived but some changed, the label stays on the passage and follows the new wording.
- If the words changed too much to follow, the label is marked Needs review. Speak AI suggests where it belongs now and remembers where it was. Nothing is deleted.
The editor warns you before you save if your changes touch labelled passages that will need review.
To clear a passage that needs review, open the Labels tab, choose Needs review, and for each passage pick one of:
- Keep to accept where the label is now.
- Re-place to select the right words yourself.
- Remove to take the label off.
Labels follow the edit a moment after the save, so if a label looks out of place straight after you save, give it a second and it will catch up.
If a teammate saved the transcript after you opened it, your save stops with “This transcript changed since you opened it. Reload to keep editing.” Reload the file to get their changes, then make yours again. This protects their edits and keeps every label on the right words.
Related: Labels on a share link · Comments · Editing · Groups and permissions